Disable Lock Screen and Screen Timeout
Android Settings > Display > Screen Timeout > Never
Android Settings > Security > Screen Lock > None
*Confirm Downloads of System Apps In PaxStore
Open PAXSTORE > Hamburger Icon in the top left > Push History
All needed apps should be pending and should download
Can swipe down on the screen to refresh
Can also tap on the PAX icon on the previous screen above serial to force a sync
If downloads do not go through you may need to clear storage on the PAXSTORE app.
If RKI Injection fails that is okay, we will handle that in the next step.
*RKI Injection
Reboot the POS. Once the SkyTab POS powers back on, allow the device about 30 seconds for the OnBoard Credit Device to reconnect. You will hear beeps from the device during this time. If there are no more beeps in a span of about 20 seconds the Credit Device is ready
Begin by opening the Shift4 application by tapping on it.
Tap on the FUNC button.
Tap on the Settings button.
Enter the default password which is the current date in a MM/DD/YYYY format.
Tap on System Settings.
Swipe up on the screen to scroll down through the settings. Scroll down to the bottom of the list.
Tap on RKI Download.
Ensure the Service Address (1) and Service Port (2) are set to “rki.pax.us” and “33519” respectively. Tap Download (3) when ready.
The application will download the needed encryption key after pressing Download.
*
Open Shift4 App (icon is a B)
The app will check the EMV reader for updates. You may hear it beep and see it connect/disconnect. Once it is finished it will switch to a permissions screen to “Display over other apps”. Allow this and tap back.
Download SkyTab
Open PAXSTORE and look for SkyTab POS > tap get > tap cloud button to download. Tap Icon again to install
When SkyTab POS runs, allow all access that it requests.
(you will have to use the back button on some screens once you toggle the setting to allow, be careful not to click back to many times or you will have to uninstall and reinstall SkyTab to get the security prompts again)
*SkyTab POS needs to have installation permissions allowed in order for future updates to properly install. If you skip this step the merchant is going to get updates and have to accept each time the updates are applied and this will cause confusion and missed updates
Tap five times on the version/serial/IP information on the bottom of the SkyTab POS PIN entry screen to access the secret testing menu.
Scroll down and select Open for Android settings.
On the main Android settings screen, swipe up on the left side to scroll down and select Apps & notifications
Touch See All <number> Apps
Select SkyTab POS
Select Advanced
Swipe up to scroll through the list of settings and select Install unknown apps
Toggle the switch ON for allow from this source.
Press the back arrow repeatedly until you return to the SkyTab POS secret menu. Then touch Back to return to the PIN entry screen.
*Q25 PinPad Programming ( not included with each terminal automatically ) Skip this step if you did not add stand alone pin pads to your order.
If the PinPad does not download do the following any password prompts, enter today's date in MMDDYYYY format .
Press Enter > System Settings > App Management > Activate > Online
After activated go back 1 screen to App Management > App update
The Q25 should download and reboot.
Once rebooted, agree to the EULA Agreement.
Press the Menu key (looks like —) > enter today's date in MMDDYYYY format > Comm Settings > Lan Parameters > Lan Type > Static.
IP Address > 1st pin pad will be 192.168.213.220, 2nd 221 and so on.
Gateway, subnet mask and DNS should already be set but double check that they are Gateway: 192.168.213.1, Subnet Mask: 255.255.255.0, DNS1 192.168.213.1 and DNS2 8.8.8.8 respectively.
*Access Settings
Touch the home button.
Tap on the Settings icon.
Password is either - 9876 or pax9876@@.
Tap OK.
Setup Wi-FiTap WLAN.
If the slider is switched off, tap it to turn on WLAN (Wi-Fi).
Ask the customer the name of their wifi network, then select the customer's wifi network.
Ask them for their password, enter the password, then tap CONNECT.
Once connected press the back arrow ↩ to return to the main settings screen
Verify Date, Time and Time ZoneOn the main setting screen, select Date & Time.
Confirm that the slider for Automatic date & time is ON.
Turn OFF the slider for automatic time zone.
Touch Select time zone and set the time zone to the merchants local time.
Turn OFF the slider for Use 24-hour format.
Touch the Home button to return to the home screen.
Open PAXSTORE AppTap on the PAXSTORE app.
The PAXSTORE app will launch but the installed version of PAXSTORE is typically outdated. So the PAXSTORE app will immediately begin to download the latest version and will close by itself and update.
Wait a minute or 2 for the PAXSTORE app to update and then re-launch the PAXSTORE app.
If a prompt displays asking to agree to the IZat location services, touch accept/agree.
The terminal will now begin downloading the apps: Skytab, Skytab Solo and PAX Broadpos Shift4.
If the terminal fails to download any of the apps or says login failed, follow one of the troubleshooting steps.
Note: BE PATIENT!!!! The apps can take a few minutes to download. If the apps fail to download after a while try one of the troubleshooting steps.
Ensure the SkyTab App is Linked to the Correct AccountThe SkyTab app needs to be checked to see if it has been linked to the correct account on the server.
On the A930, touch the Home key.
Touch to launch the SkyTab app.
The app will launch to the PIN entry screen, verify on the bottom of the screen that the MID listed matches the account number of the merchant.
Each SkyTab terminal has the Epson IP Printer Application installed. You may use this program to set your remote IP addresses or your own laptop with the EpsonNet software installed.
IP address scheme is 192.168.213.201, .202, .203
The latest version available will download once SkyTab is Launched for the first time. All Terminals and Glass devices should be on the same version.
The login screen has Version, Serial and IP address
*
The login screen has Version, Serial and IP address
Login with a manager number and navigate to
Manager, Activity, Tills
Any Open tills from Testing will need to be closed. If installation day and opening day are the same day you may need to make adjustments to your Tills or End of Day calculations based on testing data.
*
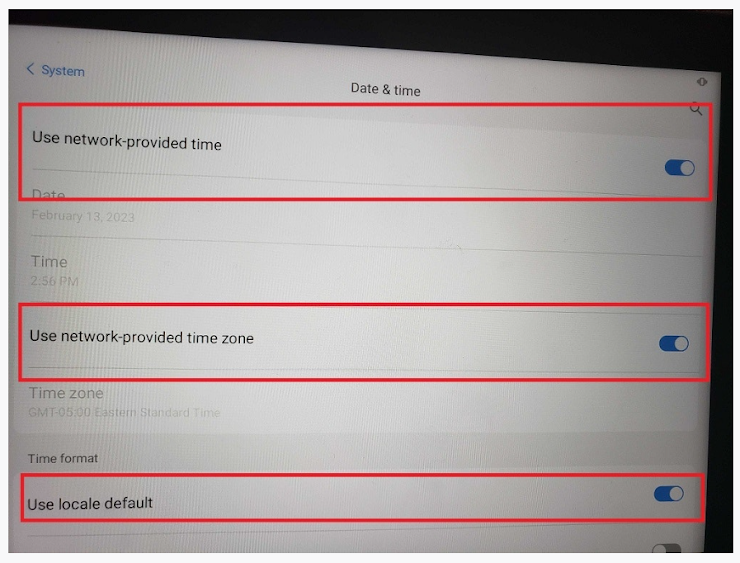
1. Disable Use network provided time2. Disable Use network provided time zone3. Disable Use locale default4. Ensure the time is set correctly5. Ensure the time zone is set correctly6. Enable Use network provided time7. Leave Network Time Zone Disabled8. Leave Use locale default Disabled
You must confirm that time and time zone are correct on every device including Mobile.
Confirm that each POS/Glass is on network time and the time stays correct. If not please contact support.*
Confirming the Date and Time on KDS units requires a keyboard to exit Android settings or the KDS will need to be restarted after Time and Date confirmation
KDS Versions and Skytab POS Versions have dependencies. Both apps should be on the most recent version to ensure compatibility.
If you manually skipped an optional update a red notifications dot will appear on the settings icon. You will be able to manually apply the update in the settings screen
If your KDS should fail to update to the most recent version perform the following steps-Send Config to any affected KDS
-Refresh from KDS settings-If no errors, restart KDS and update should prompt-If “Failure Connecting to LH” on KDS; retry Send Config / Refresh steps-If failure continues, clear data on KDS in Android App settings and set device up as you would new by confirming IP and sending config
If the device does not download the most recent version of KDS please contact support to manually install the KDS version needed for your SkyTab version.
Most systems are setup with 1111 or 1234 as a default employee PIN. Make sure they know they should reset this PIN to something different and deactivate any template employee accounts once they have themselves added in the system. Each System will have default employees for Servers, Bartenders Etc. Its important to review the security settings on default employees before duplicating them. After default Employee duplication any security settings will need to be changed PER EMPLOYEE.
*
*
Remote PrintersConfirm the IP of the PrinterPing the Printer from SkyTab POS
Set Static IP for remote printersEach remote printer when attached to the network will grab an automatic IP address and print a ticket with this ip address on the printer. Collect each ticket and label the printers with the Names you will use in SkyTab. On any terminal open Epson Network configurator In the Android Settings / Apps / see all apps. Click on the printer that you would like to configure with a static IPPrinter IPs should be 192.168.213.201 - 202 - 203
Failure to set static IPs for your remote printers can result in IP addresses changing when Auto Assigned which will prevent printing via IP in SkyTab POS
On the login screen, tap the serial number in the bottom right a few times rapidly to access the testing screen.From here, locate the Remote Printer entry. Select the appropriate printer type from the drop-down menu, then input the IP address you received from the self-test in the “IP Address: 00.00.00.00” field. Press Test.
Configure the Printer in SkyTab POSLog into the POS and navigate to Manager > Settings > Hardware > Printers. From here, either select a printer from the list on the left and press Edit Printer Setup or add a new printer by pressing Add New Printer at the bottom left of the screen.On this screen, confirm the printer configuration as follows:IP or USB: IPEnter the IP address of the printerPrinter Model: Seiko RP-D10 (Thermal) Epson TM-U220 (Dot Matrix) Kitchen Video System (KVS) Epson TM-M30
Printer will be used for: Printing Tickets
Receipt PrintersAdd New PrinterName Printer with a name to match to StationUSB, Printer Model, Printing Receipts, Assigned Station
Cash Drawers are assumed on each Station you do not have to enable a cash drawer
A Setup guide is available for scale configuration
*
*
*
Tap here to open the survey
*